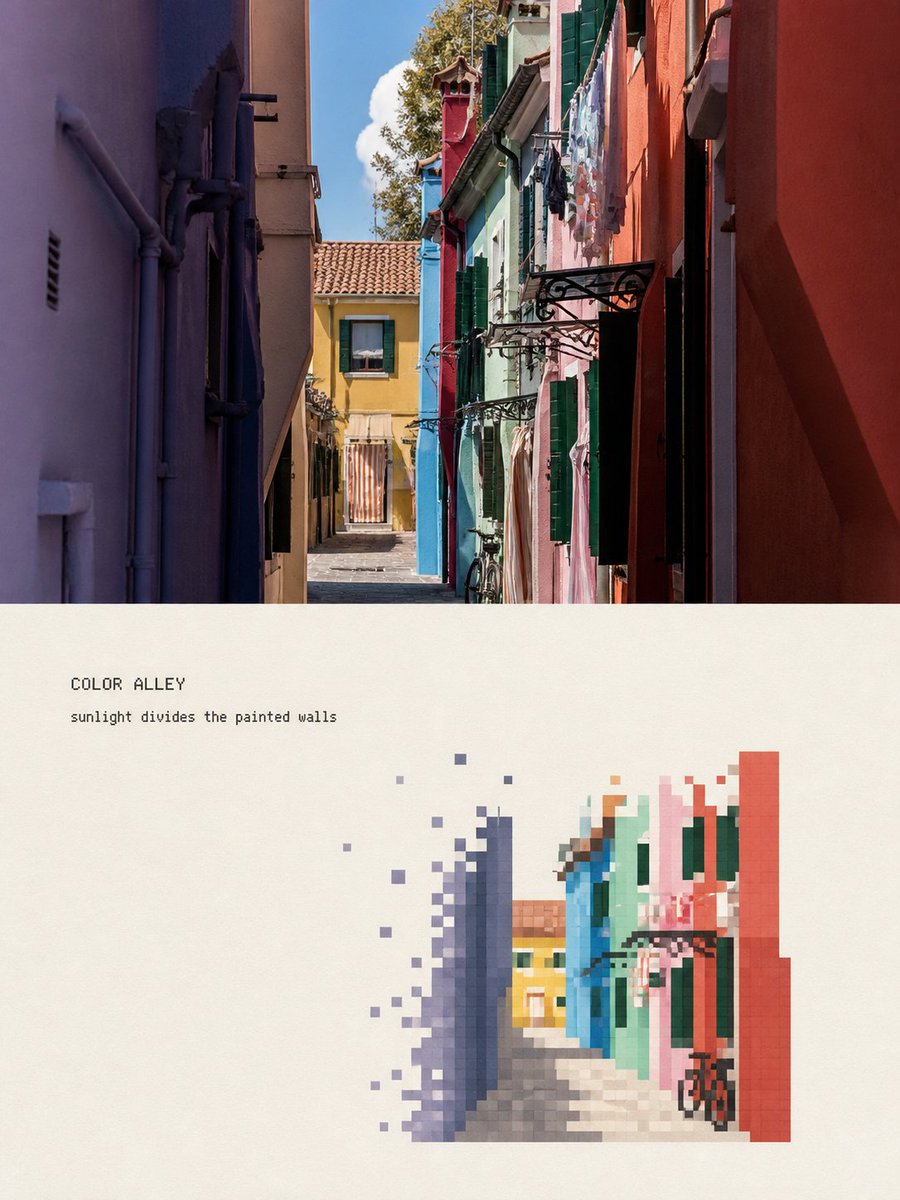
Pixelated Landscape Editorial Poster
An advanced prompt for creating editorial posters that contrast high-fidelity travel photography with a stylized pixelated 'fading' landscape interpretation.
這是一個平面設計和海報設計的GPT Image 2範例。請使用下方可直接使用的提示資訊產生類似的視覺素材,並在重複使用前查看Awesome GPT Image 2 Prompts署名和商業用途授權資訊。
需要完整的提示符號集?請使用 平面設計和海報設計 主題中心提供更多相關範例,或打開 GPT Image 2 提示庫 有關完整範例索引、可重複使用結構和來源歸屬的資訊。
Free 1K preview
Generate one preview image instantly, no sign-up required.
Free text preview doesn’t preserve reference-image consistency.
4000/4000
提示詞
可直接複製的提示
Please turn each of the travel photos I upload into an independent high-end editorial poster, with no multi-image splicing, each photo output individually. The overall layout uses a 3:4 vertical top-bottom contrast composition, with the upper and lower areas approximately 1:1, separated by a straight, clear, and clean horizontal boundary. Do not feather, permeate, or layer; do not shrink the original image into an icon, rounded card, or floating thumbnail. The upper half must retain the high-fidelity original photo. Accurately maintain the identity and quantity of subjects, architectural outlines, roof and window/door proportions, human poses, vehicles, bridges, boats, road directions, foreground/background occlusions, observation angles, real materials, natural light and shadow, and the original color atmosphere. Apply only slight, restrained color grading at the level of travel magazines, art publications, or photography exhibitions, and add a very thin film grain. Do not turn photos into illustrations; do not move, replace, add/delete, or distort subjects; do not change architectural and street perspectives. The lower half, on a warm off-white or light ivory paper surface, reorganizes the same scene into an 'artificial pixel vanishing landscape' with a large amount of white space. This is not a photo mosaic filter, nor is it lowering the resolution of the entire photo. First, select the most recognizable visual anchor from the photo, such as a bridge, a section of colored facade, a dome, a motorcycle, a bicycle, a boat, a gatehouse, or a group of clear roofs, then retain only the minimum elements that can illustrate the location and spatial relationship. Adopt a reduced and refined secondary composition: the subject usually occupies only about 30%–50% of the width and about 30%–50% of the height of the re-rendering area, concentrated in the middle-lower part, slightly to the left or right, and naturally arranged according to the direction of the original photo. Keep at least 50%–65% of the complete off-white paper surface blank on all sides. Do not completely fill the lower area with the original street scene. Only two or three layers of sparse pixel hints are kept in the background. Remove repeating window panes, fine tile lines, small signboard text, tourist shadows, dense pipelines, foliage, and photographic noise, but do not delete the eaves, bridge arches, domes, vehicle outlines, human poses, or road directions that determine the identity of the subject. Rebuild the body using discrete pixel blocks with clear edges, square or near-square: - Build the main outline, volume, light/shadow, and main color surfaces of the subject with medium-sized pixel blocks. - Use smaller, denser pixel blocks at key identification points such as eaves, spires, dome edges, window/door proportions, bridge arches, human poses, wheels, and prows. - Gradually reduce pixel density at the outer edges of buildings, vegetation, road surfaces, water surfaces, reflections, and distant views, causing squares to disconnect, dislocate, scatter, and disappear onto the paper surface. - The interior of the subject is relatively complete, and the periphery forms a clear pixel vanishing zone. - Vanishing must come from the decrease in the number and density of independent squares; do not use soft focus, feathering, smoke, transparent gradients, or pixel stretching. - A small number of discrete blocks can leave the subject along eaves, road perspective, water flow, terrain, or movement direction, but must not become random digital glitches. The color scheme is completely extracted from the current photo and compressed into about 6–12 main color steps. Retain the subject's 1–3 most recognizable colors, and then use adjacent light and dark colors to establish volume. Environmental colors are reduced in saturation and unified to natural gray, slate gray, gray-blue, gray-green, wood brown, or the photo's own architectural colors. A small area of high-saturation color that actually exists in the photo can be used as a visual focal point, such as tail lights, doors and windows, or clothing colors. The off-white paper surface must be the largest color in the re-rendering area...
Best for
- - 平面設計和海報設計 visual exploration
- - Image generation and reference-image edits
- - Reusable briefs that keep source attribution visible
Change these parts
- - Subject, product, character, or scene
- - Aspect ratio, camera, lighting, and background
- - Brand, text, color, and output constraints
Recommended model and settings
- - Model: gpt-image-2
- - Input mode: 圖生圖
- - Aspect ratio: source
- - Commercial status: review original source
How to use this prompt
- 1. Copy the prompt and preserve its structure for the first test.
- 2. Replace the subject, context, and publishing channel.
- 3. Change one camera, lighting, or style variable per iteration.
- 4. Inspect the output, source, text, and rights before reuse.
Limitations, source, and reuse cautions
- - Generated output is an editable draft, not factual, legal, or rights evidence.
- - Review the linked source, people, brands, logos, text, and third-party media before commercial use.
內容來自Awesome GPT Image 2 Prompts 。必須註明出處。商業用途狀態為allowed ;付費使用前請查看來源版權資訊。
此類案例更多
按類別、輸入模式相容性、品質和低風險進行優先排序。
重用和來源註釋
預覽案例後,請謹慎使用此提示。
- 1.複製提示或直接在 Dovoo 中使用生成按鈕開啟提示。
- 2.根據您的實際使用情況調整變數、寬高比和參考影像。
- 3.發布或付費使用前,請確認版權、署名要求以及品牌或肖像權風險。