LartAI Download Step Tutorial
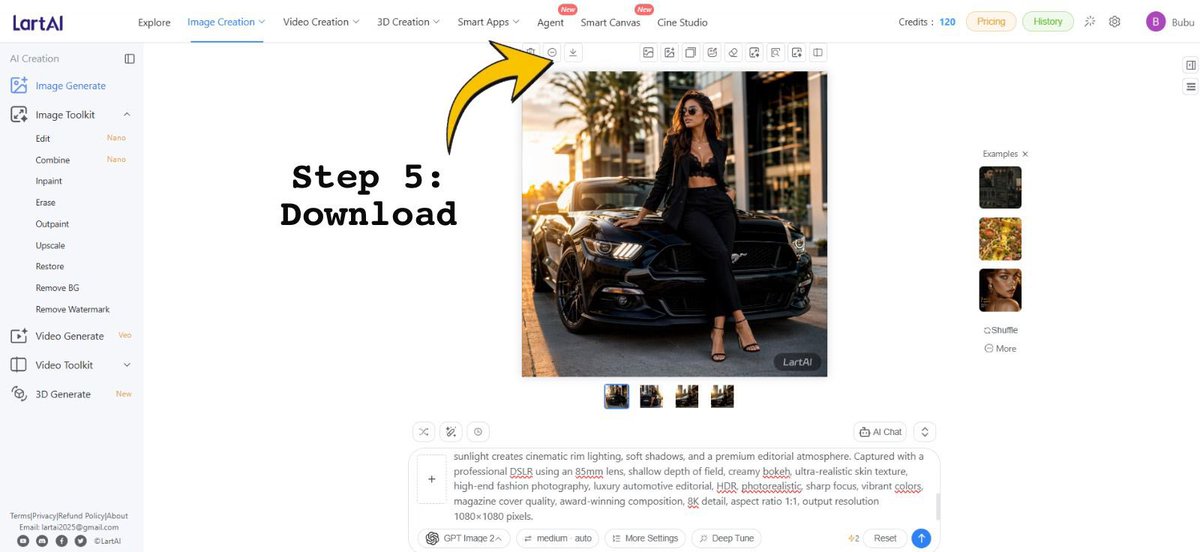
Creates a tutorial screenshot of the LartAI image generation interface with a bold Step 5 Download arrow annotation.
이것은 그래픽 및 포스터 에 대한 GPT Image 2 프롬프트 사례입니다. 아래의 복사 가능한 프롬프트를 사용하여 유사한 시각 자료를 생성하고, 재사용하기 전에 Awesome GPT Image 2 Prompts 의 저작자 표시 및 상업적 사용 권한을 검토하십시오.
전체 프롬프트 세트가 필요하신가요? 다음을 사용하세요. 그래픽 및 포스터 더 많은 관련 예시를 보려면 주제 허브를 열거나 다음을 열어보세요. GPT Image 2 프롬프트 카탈로그 전체 예제 색인, 재사용 가능한 구조 및 출처 표기는 다음을 참조하십시오.
Free 1K preview
Generate one preview image instantly, no sign-up required.
Free text preview doesn’t preserve reference-image consistency.
3993/4000
프롬프트
복사 준비 프롬프트
Goal: Create a wide tutorial-style screenshot graphic showing the LartAI image generation web app interface with an instructional overlay for downloading a generated image.

Canvas: 1200×552 horizontal screen capture composition, bright white UI, clean SaaS dashboard look, thin gray dividers, small icons, and lots of empty white space.

Layout: Full browser-app interface. A left sidebar occupies about 12% of the width, a top navigation bar spans the full width, the central workspace contains one large generated square image, and a right examples strip contains small thumbnails. Add a bold annotation on the left-center reading “Step 5: Download” in a black typewriter/monospace font, with a large curved yellow arrow outlined in black pointing upward toward the small download icon in the top toolbar above the generated image.

Top navigation: Show the LartAI logo at top left. Include exactly 7 main navigation items across the top: “Explore”, “Image Creation” highlighted/underlined in blue, “Video Creation”, “3D Creation”, “Smart Apps”, “Agent”, “Smart Canvas”, and “Cine Studio”; place small red “New” badges near Agent and Smart Canvas. On the right, show “Credits: 120”, pill buttons “Pricing” and “History”, small utility icons, and a purple circular avatar with the letter “B” followed by the username {argument name="user name" default="Bubu"}.

Left sidebar: Under the “AI Creation” heading, show exactly 14 visible tool entries: “Image Generate” selected in blue, “Image Toolkit”, “Edit” with a small “Nano” tag, “Combine” with a small “Nano” tag, “Inpaint”, “Erase”, “Outpaint”, “Upscale”, “Restore”, “Remove BG”, “Remove Watermark”, “Video Generate” with a small “Veo” tag, “Video Toolkit”, and “3D Generate” with a small “New” tag. At the bottom, include tiny footer text links and social icons, resembling Terms/Privacy/Refund Policy/About and contact details.

Central generated image: Display a square fashion editorial photo of {argument name="main subject" default="a stylish woman wearing sunglasses, a black blazer, black crop top, black trousers, and strappy heels"} leaning against the front of {argument name="vehicle" default="a glossy black Ford Mustang"} on a city street at golden hour. The subject sits on the car hood/front corner with one leg bent, palm trees and modern buildings in the background, warm cinematic sunlight, realistic shadows, high-end fashion and luxury automotive photography. Add a small dark “LartAI” watermark in the lower-right corner of this generated image.

Toolbar and controls: Above the square image, show a row of small square action icons, with the yellow arrow specifically pointing at the download icon. Beneath the large image, show exactly 4 small square result thumbnails in a row, with the first thumbnail selected using a blue border.

Right examples panel: Show the heading “Examples ×” and exactly 3 stacked example thumbnails: a dark car/fashion image, a yellow floral image, and a woman’s face portrait. Below them show exactly 2 small text controls: “Shuffle” and “More”.

Bottom prompt area: Include a large prompt input box with a plus button at its left and a visible text prompt beginning with “sunlight creates cinematic rim lighting, soft shadows, and a premium editorial atmosphere...” and containing underlined red spellcheck marks on some words. Below it, show controls including “GPT Image 2”, “medium auto”, “More Settings”, “Deep Tune”, a “4/2” indicator, “Reset”, and a blue circular send button.

Text overlay: The annotation text must read exactly {argument name="step label" default="Step 5:\nDownload"}. Use very large black bold typewriter lettering. The arrow should be bright yellow with a thick black outline, curved, and point from the text region toward the top toolbar download button.

Constraints: Preserve the clean web-app screenshot style, keep all UI text in English, use crisp small interface typography, no browser chrome, no extra popups, and no additional instructional steps.
프롬프트 변수
프롬프트에 있는 편집 가능한 인수 자리 표시자와 해당 기본값입니다.
변하기 쉬운
user name
기본
Bubu
변하기 쉬운
main subject
기본
a stylish woman wearing sunglasses, a black blazer, black crop top, black trousers, and strappy heels
변하기 쉬운
vehicle
기본
a glossy black Ford Mustang
변하기 쉬운
step label
기본
Step 5:\nDownload
Best for
- - 그래픽 및 포스터 visual exploration
- - Image generation and reference-image edits
- - Reusable briefs that keep source attribution visible
Change these parts
- - Subject, product, character, or scene
- - Aspect ratio, camera, lighting, and background
- - Brand, text, color, and output constraints
Recommended model and settings
- - Model: gpt-image-2
- - Input mode: 이미지 to 이미지
- - Aspect ratio: source
- - Commercial status: review original source
How to use this prompt
- 1. Copy the prompt and preserve its structure for the first test.
- 2. Replace the subject, context, and publishing channel.
- 3. Change one camera, lighting, or style variable per iteration.
- 4. Inspect the output, source, text, and rights before reuse.
Limitations, source, and reuse cautions
- - Generated output is an editable draft, not factual, legal, or rights evidence.
- - Review the linked source, people, brands, logos, text, and third-party media before commercial use.
Awesome GPT Image 2 Prompts 에서 가져왔습니다. 출처 표기가 필요합니다. 상업적 이용 가능 여부는 allowed 입니다. 유료 사용 전에 원저작권 정보를 확인하세요.
이 범주에 속하는 더 많은 사례
범주, 입력 방식 호환성, 품질 및 위험도에 따라 우선순위가 정해집니다.
재사용 및 출처 참고 사항
사례를 미리 확인한 후 이 안내 메시지를 안전하게 사용하십시오.
- 1.프롬프트를 복사하거나 Dovoo의 생성 버튼을 사용하여 직접 엽니다.
- 2.사용 사례에 맞게 변수, 화면 비율 및 참조 이미지를 조정하십시오.
- 3.출판 또는 유료 사용 전에 저작권, 출처 표기 요건 및 브랜드 또는 초상권 관련 위험을 확인하십시오.