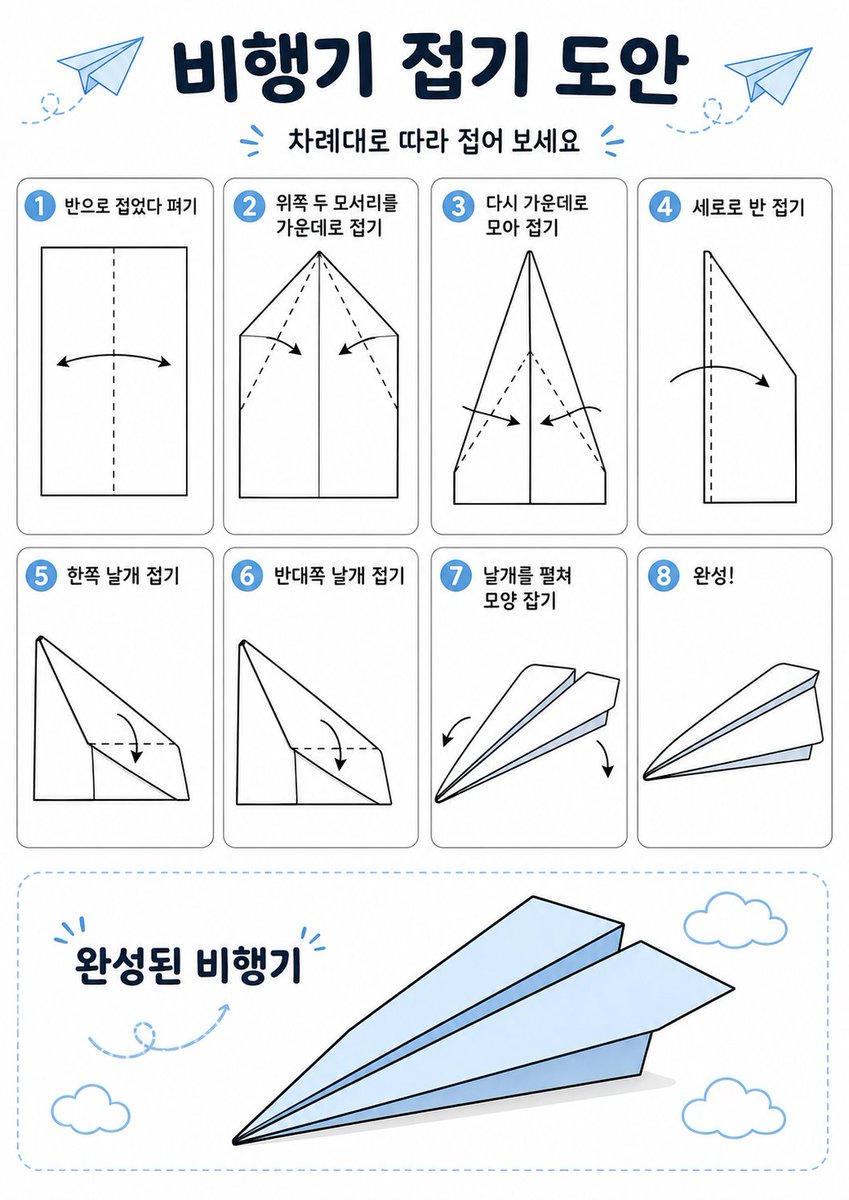
한국 종이비행기 접기 포스터
이 프롬프트는 8단계로 구성된 종이비행기 접는 방법을 설명하는 깔끔한 한국어 종이접기 안내 인포그래픽을 생성합니다.
이것은 그래픽 및 포스터 에 대한 GPT Image 2 프롬프트 사례입니다. 아래의 복사 가능한 프롬프트를 사용하여 유사한 시각 자료를 생성하고, 재사용하기 전에 Awesome GPT Image 2 Prompts 의 저작자 표시 및 상업적 사용 권한을 검토하십시오.
전체 프롬프트 세트가 필요하신가요? 다음을 사용하세요. 그래픽 및 포스터 더 많은 관련 예시를 보려면 주제 허브를 열거나 다음을 열어보세요. GPT Image 2 프롬프트 카탈로그 전체 예제 색인, 재사용 가능한 구조 및 출처 표기는 다음을 참조하십시오.
Free 1K preview
Generate one preview image instantly, no sign-up required.
3948/4000
프롬프트
복사 준비 프롬프트
{
  "type": "origami instruction poster",
  "topic": "paper airplane folding guide",
  "language": "Korean",
  "style": {
    "overall": "clean educational infographic, simple vector line art, friendly classroom worksheet aesthetic",
    "palette": {
      "background": "white",
      "primary": "dark navy",
      "accent": "light sky blue",
      "line": "black",
      "shadow": "soft light gray"
    },
    "rendering": "flat 2D layout with crisp outlines and minimal shading"
  },
  "canvas": {
    "orientation": "portrait",
    "margin": "generous white margins"
  },
  "header": {
    "title": "{argument name=\"headline text\" default=\"비행기 접기 도안\"}",
    "subtitle": "{argument name=\"subtitle text\" default=\"차례대로 따라 접어 보세요\"}",
    "decorations": {
      "paper_airplanes": 2,
      "dashed_flight_paths": 2,
      "blue_accent_marks": 2
    }
  },
  "layout": {
    "grid": {
      "columns": 4,
      "rows": 2,
      "step_cards": 8
    },
    "sections": [
      {
        "title": "steps row 1",
        "position": "upper middle",
        "count": 4,
        "labels": [
          "1 반으로 접었다 펴기",
          "2 위쪽 두 모서리를 가운데로 접기",
          "3 다시 가운데로 모아 접기",
          "4 세로로 반 접기"
        ]
      },
      {
        "title": "steps row 2",
        "position": "middle",
        "count": 4,
        "labels": [
          "5 한쪽 날개 접기",
          "6 반대쪽 날개 접기",
          "7 날개를 펼쳐 모양 잡기",
          "8 완성!"
        ]
      },
      {
        "title": "finished airplane display",
        "position": "bottom",
        "count": 1,
        "labels": [
          "완성된 비행기"
        ]
      }
    ]
  },
  "step_cards": [
    {
      "step": 1,
      "badge": "1",
      "text": "반으로 접었다 펴기",
      "diagram": "vertical rectangle sheet with a centered vertical dashed fold line and a curved double-headed arrow indicating folding inward and reopening"
    },
    {
      "step": 2,
      "badge": "2",
      "text": "위쪽 두 모서리를 가운데로 접기",
      "diagram": "paper with pointed top, both upper corners folded to the center line, dashed diagonal guide lines, two inward arrows"
    },
    {
      "step": 3,
      "badge": "3",
      "text": "다시 가운데로 모아 접기",
      "diagram": "narrower pointed shape, side edges folded again toward the center line, dashed diagonal guides, two inward arrows near the lower middle"
    },
    {
      "step": 4,
      "badge": "4",
      "text": "세로로 반 접기",
      "diagram": "side-view folded shape with a vertical dashed center line and one large curved arrow showing the model folded in half lengthwise"
    },
    {
      "step": 5,
      "badge": "5",
      "text": "한쪽 날개 접기",
      "diagram": "triangular side-view airplane body with one wing folded downward, dashed horizontal guide near the top edge and a curved arrow"
    },
    {
      "step": 6,
      "badge": "6",
      "text": "반대쪽 날개 접기",
      "diagram": "same side-view as step 5, folding the opposite wing downward with matching dashed guide and curved arrow"
    },
    {
      "step": 7,
      "badge": "7",
      "text": "날개를 펼쳐 모양 잡기",
      "diagram": "3D paper airplane opening into shape, two curved arrows pointing downward and outward on each side"
    },
    {
      "step": 8,
      "badge": "8",
      "text": "완성!",
      "diagram": "completed paper airplane in simple perspective, light blue top faces, black outline, no arrows"
    }
  ],
  "bottom_panel": {
    "container": "large rounded rectangle with light blue dashed border",
    "label": "완성된 비행기",
    "main_object": "large completed paper airplane angled from lower left to upper right, pale blue surfaces with black outline and subtle gray shadow beneath",
    "decorations": {
      "clouds": 3,
      "swirl_arrow": 1
    }
  },
  "text_style": {
    "title": "bold rounded Korean display font in dark navy",
    "subtitle": "smaller bold Korean text",
    "step_labels": "bold black Korean text",
    "number_badges": "white numbers inside blue circles"
  }
}
프롬프트 변수
프롬프트에 있는 편집 가능한 인수 자리 표시자와 해당 기본값입니다.
변하기 쉬운
headline text
기본
비행기 접기 도안
변하기 쉬운
subtitle text
기본
차례대로 따라 접어 보세요
Best for
- - 그래픽 및 포스터 visual exploration
- - Image generation and reference-image edits
- - Reusable briefs that keep source attribution visible
Change these parts
- - Subject, product, character, or scene
- - Aspect ratio, camera, lighting, and background
- - Brand, text, color, and output constraints
Recommended model and settings
- - Model: gpt-image-2
- - Input mode: 텍스트 to 이미지
- - Aspect ratio: source
- - Commercial status: review original source
How to use this prompt
- 1. Copy the prompt and preserve its structure for the first test.
- 2. Replace the subject, context, and publishing channel.
- 3. Change one camera, lighting, or style variable per iteration.
- 4. Inspect the output, source, text, and rights before reuse.
Limitations, source, and reuse cautions
- - Generated output is an editable draft, not factual, legal, or rights evidence.
- - Review the linked source, people, brands, logos, text, and third-party media before commercial use.
Awesome GPT Image 2 Prompts 에서 가져왔습니다. 출처 표기가 필요합니다. 상업적 이용 가능 여부는 allowed 입니다. 유료 사용 전에 원저작권 정보를 확인하세요.
이 범주에 속하는 더 많은 사례
범주, 입력 방식 호환성, 품질 및 위험도에 따라 우선순위가 정해집니다.



재사용 및 출처 참고 사항
사례를 미리 확인한 후 이 안내 메시지를 안전하게 사용하십시오.
- 1.프롬프트를 복사하거나 Dovoo의 생성 버튼을 사용하여 직접 엽니다.
- 2.사용 사례에 맞게 변수, 화면 비율 및 참조 이미지를 조정하십시오.
- 3.출판 또는 유료 사용 전에 저작권, 출처 표기 요건 및 브랜드 또는 초상권 관련 위험을 확인하십시오.