ComfyUI GPT Image Mask Workflow
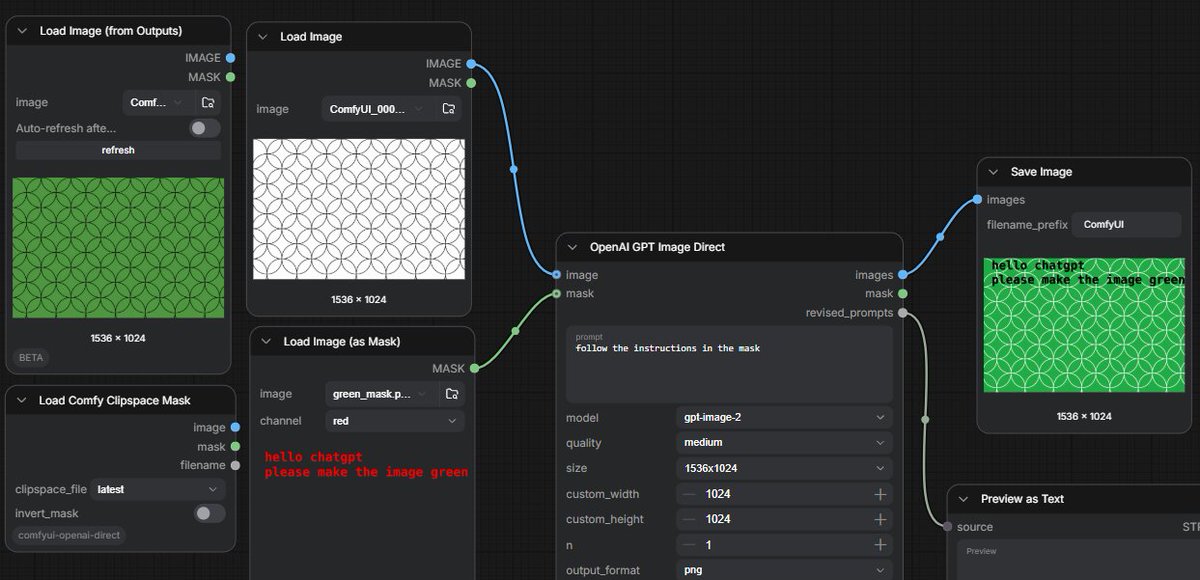
A dark ComfyUI workflow screenshot showing GPT image editing controlled by text instructions embedded in a mask.
이것은 다른 영감 에 대한 GPT Image 2 프롬프트 사례입니다. 아래의 복사 가능한 프롬프트를 사용하여 유사한 시각 자료를 생성하고, 재사용하기 전에 Awesome GPT Image 2 Prompts 의 저작자 표시 및 상업적 사용 권한을 검토하십시오.
전체 프롬프트 세트가 필요하신가요? 다음을 사용하세요. 다른 영감 더 많은 관련 예시를 보려면 주제 허브를 열거나 다음을 열어보세요. GPT Image 2 프롬프트 카탈로그 전체 예제 색인, 재사용 가능한 구조 및 출처 표기는 다음을 참조하십시오.
Free 1K preview
Generate one preview image instantly, no sign-up required.
Free text preview doesn’t preserve reference-image consistency.
3302/4000
프롬프트
복사 준비 프롬프트
Goal: Create a widescreen screenshot-style image of a dark ComfyUI node graph demonstrating GPT image editing from a text instruction embedded in a mask.

Canvas: 1200×580 horizontal frame, dark charcoal grid background, cropped like a real workflow editor screenshot. Use crisp UI panels with rounded corners, subtle shadows, small sans-serif interface text, and colored connection cables.

Layout: Arrange exactly 7 visible workflow nodes from left to right across the canvas. Include 4 nodes on the left, 1 large central processing node, and 2 output/preview nodes on the right. Show blue image sockets and green mask sockets connected by curved wires.

Nodes and contents:
1. Top-left node titled “Load Image (from Outputs)”. It shows a green rectangular preview filled with a repeating circle/arc geometric pattern, size label “1536 × 1024”, and small controls including image selector, auto-refresh toggle, and refresh button.
2. Upper-middle-left node titled “Load Image”. It shows a white rectangular preview with thin black repeating overlapping circle pattern, size label “1536 × 1024”. Connect its blue IMAGE output to the central node image input.
3. Lower-middle-left node titled “Load Image (as Mask)”. It shows a dark preview with red pixel-like text reading “hello chatgpt” on the first line and “please make the image green” on the second line. The channel dropdown says “red”. Connect its green MASK output to the central node mask input.
4. Bottom-left node titled “Load Comfy Clipspace Mask”. Include controls labeled clipspace_file “latest” and invert_mask toggle, plus small image and mask sockets. This node is visible but not the main connection.
5. Center node titled “OpenAI GPT Image Direct”. It has inputs labeled image and mask; outputs labeled images, mask, and revised_prompts. The prompt textbox contains {argument name="instruction prompt" default="follow the instructions in the mask"}. Settings visible: model {argument name="model" default="gpt-image-2"}, quality {argument name="quality" default="medium"}, size {argument name="image size" default="1536x1024"}, custom_width 1024, custom_height 1024, n 1, output_format png. Connect its blue images output to Save Image, and its gray/green mask or revised prompt output down to Preview as Text.
6. Upper-right node titled “Save Image”. It shows filename_prefix “ComfyUI” and a result preview: the same circular pattern now colored bright green, with the black text instruction overlaid in the upper-left reading “hello chatgpt” and “please make the image green”; size label “1536 × 1024”.
7. Lower-right node titled “Preview as Text”, partially cropped at the bottom edge, connected from the central node’s revised_prompts output; show a small “source” label and a “Preview” area.

Visual style: Realistic UI screenshot, dark theme, subtle grid, rounded black-gray panels, white and gray interface labels, blue and green socket dots, curved blue/green connector lines. The generated image previews should look flat and procedural rather than photorealistic.

Constraints: Keep the exact workflow concept readable: a white patterned input image plus a mask containing text instructions produces a green patterned output. Do not add people, branding outside ComfyUI/OpenAI labels, extra nodes, or decorative elements.
프롬프트 변수
프롬프트에 있는 편집 가능한 인수 자리 표시자와 해당 기본값입니다.
변하기 쉬운
instruction prompt
기본
follow the instructions in the mask
변하기 쉬운
model
기본
gpt-image-2
변하기 쉬운
quality
기본
medium
변하기 쉬운
image size
기본
1536x1024
Best for
- - 다른 영감 visual exploration
- - Image generation and reference-image edits
- - Reusable briefs that keep source attribution visible
Change these parts
- - Subject, product, character, or scene
- - Aspect ratio, camera, lighting, and background
- - Brand, text, color, and output constraints
Recommended model and settings
- - Model: gpt-image-2
- - Input mode: 이미지 to 이미지
- - Aspect ratio: source
- - Commercial status: review original source
How to use this prompt
- 1. Copy the prompt and preserve its structure for the first test.
- 2. Replace the subject, context, and publishing channel.
- 3. Change one camera, lighting, or style variable per iteration.
- 4. Inspect the output, source, text, and rights before reuse.
Limitations, source, and reuse cautions
- - Generated output is an editable draft, not factual, legal, or rights evidence.
- - Review the linked source, people, brands, logos, text, and third-party media before commercial use.
Awesome GPT Image 2 Prompts 에서 가져왔습니다. 출처 표기가 필요합니다. 상업적 이용 가능 여부는 allowed 입니다. 유료 사용 전에 원저작권 정보를 확인하세요.
이 범주에 속하는 더 많은 사례
범주, 입력 방식 호환성, 품질 및 위험도에 따라 우선순위가 정해집니다.
재사용 및 출처 참고 사항
사례를 미리 확인한 후 이 안내 메시지를 안전하게 사용하십시오.
- 1.프롬프트를 복사하거나 Dovoo의 생성 버튼을 사용하여 직접 엽니다.
- 2.사용 사례에 맞게 변수, 화면 비율 및 참조 이미지를 조정하십시오.
- 3.출판 또는 유료 사용 전에 저작권, 출처 표기 요건 및 브랜드 또는 초상권 관련 위험을 확인하십시오.